

DataFX Tutorial 5
#DataFX
#JavaFX

This is the last tutorial about the basic flow and action API of [DataFX]({{ site.baseurl }}{% link pages/projects/datafx.md %}). I plan to start a second tutorial series about injection and resources in DataFX. But in those parts of DataFX 8 the APIs aren't final at the moment. So it will sadly take one or two month before I can continue the tutorials. An overview of all tutorials can be found here.
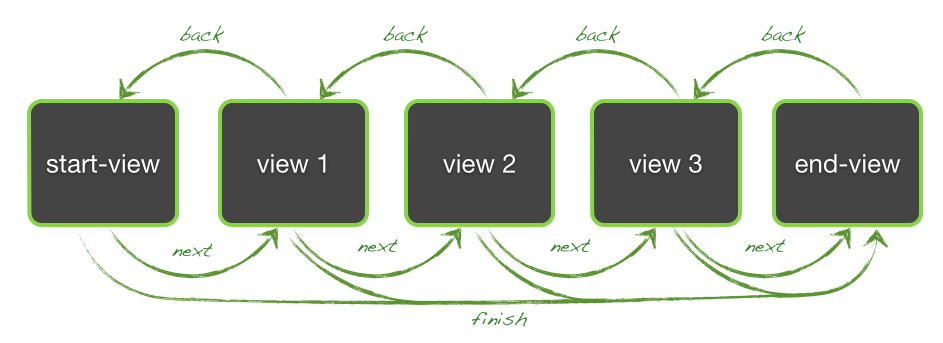
In this tutorial I want to show how flows can be interlaced. Therefore we create a new variation of the wizard app that was shown in tutorial 4. The application should provide a simple wizard with some steps. Here is an overview how the dialogs and the flow where defined in tutorial 4:
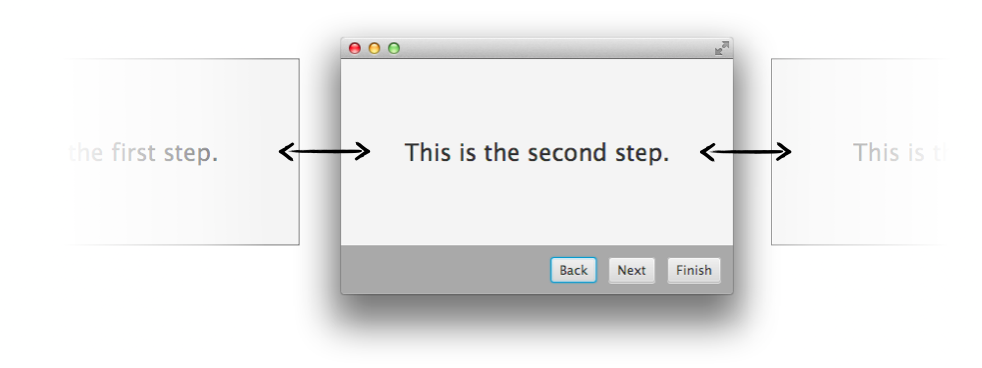
Once the application is finished it will look like the own that was created last time:

The last implementation of the wizard has one weak point in its architecture: Each step of the wizard is defined as a view in a flow. The view contains the complete view of the application and so also the action toolbar is part of each view. In the last tutorial we extracted the toolbar in a separate FXML file but the controls were created for each view individually. But the toolbar has the same functionality on each view and normally it should be one single instance and only the view in the center of the application should change:
This more logical structure is part of this tutorial and by using interlaced flows the favored behavior can be created. As always we will start by creating the FXML files for the application. Because the top views of the wizard should be defined in a separate flow there will be FXML files for the views that only contain the content of one wizard step. Here is an example for the first step:
<?import javafx.geometry.Insets?>
<?import javafx.scene.control.Label?>
<?import javafx.scene.layout.StackPane?>
<?import javafx.scene.text.Font?>
<label text="Welcome!">
    <font>
        <font size="24.0">
    </font>
</label>
As you can see the FXML is much shorter than in the other tutorials. It only contains the Label that will be shown on the first view of the wizard.
For the toolbar we can use the same FXML file as in tutorial 4:
<?import java.lang.*?>
<?import java.util.*?>
<?import javafx.geometry.*?>
<?import javafx.scene.control.*?>
<?import javafx.scene.layout.*?>
<?import javafx.scene.paint.*?>
<hbox alignment="CENTER_RIGHT" maxheight="-Infinity" maxwidth="1.7976931348623157E308" minheight="-Infinity" minwidth="-Infinity" prefheight="-1.0" prefwidth="-1.0" spacing="12.0" style="-fx-background-color: darkgray;" xmlns="http://javafx.com/javafx/8" xmlns:fx="http://javafx.com/fxml/1">
    <children>
        <button fx:id="backButton" mnemonicparsing="false" text="Back"></button>
        <button fx:id="nextButton" mnemonicparsing="false" text="Next"></button>
        <button fx:id="finishButton" mnemonicparsing="false" text="Finish"></button>
    </children>
    <padding>
        <insets bottom="12.0" left="12.0" right="12.0" top="12.0" />
    </padding>
</hbox>
The FXML defines a HBox that include the 3 action buttons.
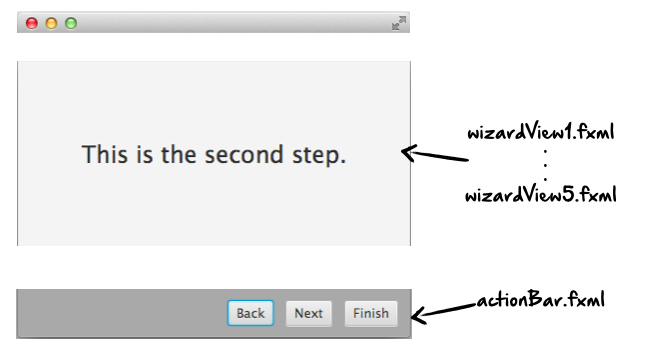
Once this is done the application is defined by the following FXML files:
As a next step a master FXML file is needed that includes the different components. As shown in then last tutorial the fx:include tag can be used to include FXML files within each other. Because the toolbar will be static component and the bottom of the application it can be included in the main FXML file. The wizard views on the top will change. Therefore we add a StackPane to the main FXML file that will hold the views. Here is the FXML file:
<?import java.lang.*?>
<?import javafx.geometry.*?>
<?import javafx.scene.control.*?>
<?import javafx.scene.layout.*?>
<?import javafx.scene.text.*?>
<?import javafx.geometry.Insets?>
<?import javafx.scene.control.Label?>
<?import javafx.scene.layout.BorderPane?>
<?import javafx.scene.layout.StackPane?>
<?import javafx.scene.text.Font?>
<?import java.lang.*?>
<?import java.util.*?>
<?import javafx.geometry.*?>
<?import javafx.scene.control.*?>
<?import javafx.scene.layout.*?>
<?import javafx.scene.paint.*?>
<borderpane prefheight="240.0" prefwidth="400.0" xmlns="http://javafx.com/javafx/8" xmlns:fx="http://javafx.com/fxml/1">
    <bottom>
        <fx:include source="actionBar.fxml" />
    </bottom>
    <center>
        <stackpane fx:id="centerPane" maxheight="1.7976931348623157E308" maxwidth="1.7976931348623157E308" borderpane.alignment="CENTER"></stackpane>
    </center>
</borderpane>
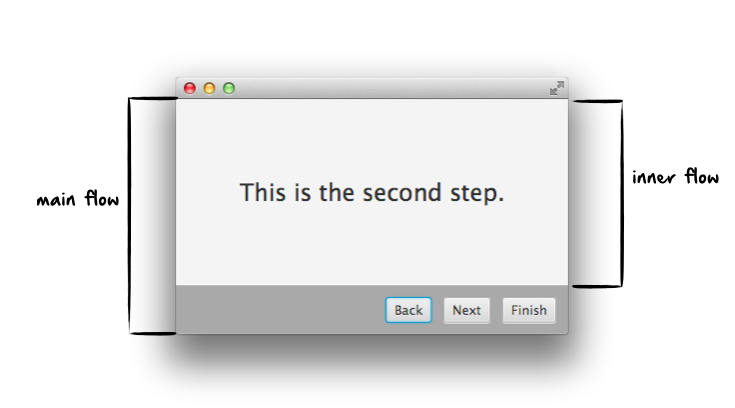
The StackPane that will hold the central views of the wizard is defined by the unique id "centerPane". Once this is done all FXML files are finished and we can start to code in JavaFX. Let's take a look at the general structure of the application before we start to define the needed flows. As said the application will contain two flows that are interlaced. Here is a graphic that shows the structure:
We will start with the view controller classes for all the wizard steps. Because the action toolbars isn't part of this views anymore and they contain only a label the code is very short :) Here is the class for the first view controller:
public class WizardView1Controller {
}
Easy, isn't it? The class is only needed to specify the view in the Java code and create the binding between the class and the FXML file. As you can see in the code of the example all other controller classes will look like this.
As a next step we will create the flow of for these views. Here we only need to link the view for navigation. Therefore the definition of the flow will look like this:
                withLink(WizardView1Controller.class, "next", WizardView2Controller.class).
                withLink(WizardView2Controller.class, "next", WizardView3Controller.class).
                withLink(WizardView3Controller.class, "next", WizardView4Controller.class).
                withLink(WizardView4Controller.class, "next", WizardView5Controller.class);
Ok, but where should this flow be defined. Until now all flows were defined in the main class of the application but this flow is an inner flow that will be part of another flow. To better understand how this can be achieved we should have a look at the main class of the application:
    public static void main(String[] args) {
        launch(args);
    }
    @Override
    public void start(Stage primaryStage) throws Exception {
        Flow flow  = new Flow(WizardController.class);
        FlowHandler flowHandler = flow.createHandler();
        StackPane pane = flowHandler.start(new DefaultFlowContainer());
        primaryStage.setScene(new Scene(pane));
        primaryStage.show();
    }
}
As in all other tutorials a flow is defined and started in the application class. But as you can see this flow defines only one start view that is defined by its controller class (WizardController). This class defines the controller of the main view of the application that is defined by the main FXML file as already shown. The flow that defines the steps of the wizard will be an inner flow in this view. Therefore the inner flow is defined in the WizardController controller class:
public class WizardController {
    @FXML
    private StackPane centerPane;
    private FlowHandler flowHandler;
    @PostConstruct
    public void init() throws FlowException {
        Flow innerFlow = new Flow(WizardView1Controller.class).
                withLink(WizardView1Controller.class, "next", WizardView2Controller.class).
                withLink(WizardView2Controller.class, "next", WizardView3Controller.class).
                withLink(WizardView3Controller.class, "next", WizardView4Controller.class).
                withLink(WizardView4Controller.class, "next", WizardView5Controller.class);
        flowHandler = innerFlow.createHandler();
        centerPane.getChildren().add(flowHandler.start(new AnimatedFlowContainer(Duration.millis(320), ContainerAnimations.ZOOM_IN)));
    }
}
Here all the steps of the wizard are added and linked to the inner flow. As you can see in the code the flow is started in a difference way than it was done several times before. A FlowHandler instance is created and this instances is started. This is wrapped in the startInStage() method of the Flow class that was used in all the other tutorials. The FlowHandler instance represents a running flow. The Flow class only defines the structure of a flow and can be started several times in parallel. Each running flow instance is defined by a FlowHandler instance and The FlowHandler instance can be used to interact with the flow. In addition the start(...) method of the FlowHandler class needs a FlowContainer as parameter. The FlowContainer provides a parent node in that the flow will be shown. In this case we use an AnimatedFlowContainer that provides animations whenever the flow navigates to a different view. We will see the animations at the end of the tutorial. The flow will be placed in the centerPane that is defined by FXML and injected in the controller by using the @FXML annotation.
As said the FlowHandler class provides methods to interact with the flow. We will use this methods in the tutorial to call the "next", "back" and "finish" actions of the flow. To do so we need the action buttons that can easily be injected in the controller class:
public class WizardController {
    @FXML
    @ActionTrigger("back")
    private Button backButton;
    @FXML
    @ActionTrigger("finish")
    private Button finishButton;
    @FXML
    @ActionTrigger("next")
    private Button nextButton;
    @FXML
    private StackPane centerPane;
    //init()...
}
All the Buttons are annotated by the @ActionTrigger annotation and will therefore trigger actions in the flow. But they won't trigger actions in the inner flow because they are defined in the global flow that is defined in the main class. To handle this actions we will create some methods that are annoted by the @ActionMethod() annotation. As seen in tutorial 1 these methods will be called whenever the action with the matching unique id is called:
public class WizardController {
    @FXML
    @ActionTrigger("back")
    private Button backButton;
    @FXML
    @ActionTrigger("finish")
    private Button finishButton;
    @FXML
    @ActionTrigger("next")
    private Button nextButton;
    //init()...
    @ActionMethod("back")
    public void onBack() throws VetoException, FlowException {
    }
    @ActionMethod("next")
    public void onNext() throws VetoException, FlowException {
    }
    @ActionMethod("finish")
    public void onFinish() throws VetoException, FlowException {
    }
}
In these methods the FlowHandler instance of the inner flow can be used to interact with the inner flow and navigate to new views or trigger actions. In addition some logic is needed to enable and disable the action buttons depending on the state of the inner flow. Here is the complete code of the WizardController class with the final implementation of these methods:
public class WizardController {
    @FXML
    @ActionTrigger("back")
    private Button backButton;
    @FXML
    @ActionTrigger("finish")
    private Button finishButton;
    @FXML
    @ActionTrigger("next")
    private Button nextButton;
    @FXML
    private StackPane centerPane;
    private FlowHandler flowHandler;
    @PostConstruct
    public void init() throws FlowException {
        Flow flow = new Flow(WizardView1Controller.class).
                withLink(WizardView1Controller.class, "next", WizardView2Controller.class).
                withLink(WizardView2Controller.class, "next", WizardView3Controller.class).
                withLink(WizardView3Controller.class, "next", WizardView4Controller.class).
                withLink(WizardView4Controller.class, "next", WizardView5Controller.class);
        flowHandler = flow.createHandler();
        centerPane.getChildren().add(flowHandler.start(new AnimatedFlowContainer(Duration.millis(320), ContainerAnimations.ZOOM_IN)));
        backButton.setDisable(true);
    }
    @ActionMethod("back")
    public void onBack() throws VetoException, FlowException {
        flowHandler.navigateBack();
        if(flowHandler.getCurrentViewControllerClass().equals(WizardView1Controller.class)) {
            backButton.setDisable(true);
        } else {
            backButton.setDisable(false);
        }
        finishButton.setDisable(false);
        nextButton.setDisable(false);
    }
    @ActionMethod("next")
    public void onNext() throws VetoException, FlowException {
        flowHandler.handle("next");
        if(flowHandler.getCurrentViewControllerClass().equals(WizardView5Controller.class)) {
            nextButton.setDisable(true);
            finishButton.setDisable(true);
        } else {
            nextButton.setDisable(false);
        }
        backButton.setDisable(false);
    }
    @ActionMethod("finish")
    public void onFinish() throws VetoException, FlowException {
        flowHandler.navigateTo(WizardView5Controller.class);
        finishButton.setDisable(true);
        nextButton.setDisable(true);
        backButton.setDisable(false);
    }
}
Once this is done you can start the flow and navigate through all the steps of the wizard. Thanks to the AnimatedFlowContainer container each link will be animated:
As I said this is the final tutorial about the Flow API. From our point of view the API is finshed and we only plan to polish some stuff and add documentation. But we plan to release DataFX 8 at JavaOne and so there is still some time to change things. So if you have any questions, feedback or improvements please let us now. The next step is the CDI part of DataFX and once the APIs are stable I will continue this tutorial series.