DataFX Tutorial 4
#DataFX
#JavaFX

This is the 4th tutorial about navigation with [DataFX]({{ site.baseurl }}{% link pages/projects/datafx.md %}) and the DataFX flow API. An overview of all tutorials can be found here. In this tutorial I will show how you can manage the action handling and navigation of a flow from outside of the flow. To do so we will refactor the wizard that was created in tutorial 3.
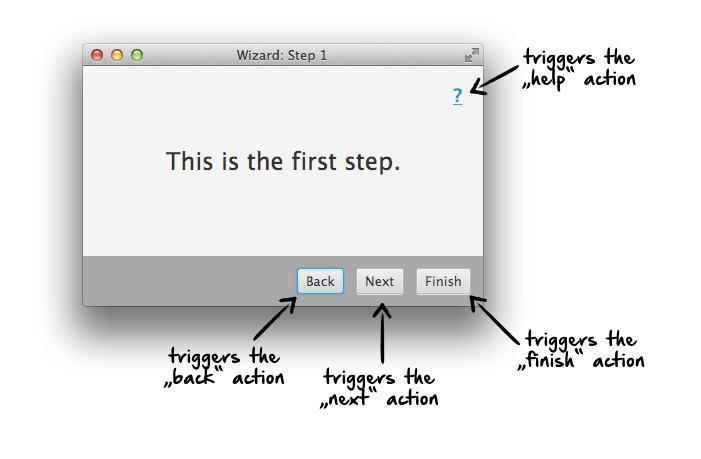
As described in tutorial 3 the wizard will be composed of some views that define the steps of the wizard. In addition a toolbar with some buttons is placed on the bottom. The views will look like this:

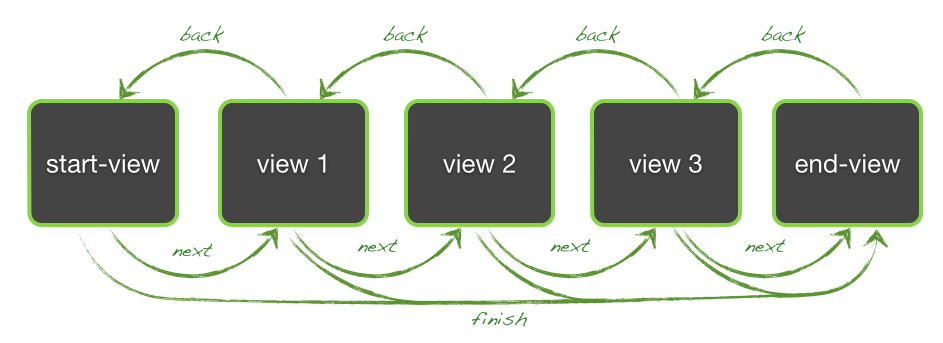
All views of the wizard are linked by a navigation model. In tutorial 3 this was created by directly in the view controller classes so each view defines its navigation and actions. In this tutorial we will use the second approach that DataFX provides: All views doesn't know anything about there action and navigation model. Instead of this the actions are defined extern. The navigation and action behavior will be the same as in tutorial 3. Here is a short overview about the links between the views of the wizard:
As always we want to start by defining the views in FXML. Because the toolbar will look the same on each view we can extract it in a seperate FXML file. As shown in tutorial 3 a FXML file can included in another one by using the fx:include tag. Here is the FXML definition of the toolbar:
<?import java.lang.*?>
<?import java.util.*?>
<?import javafx.geometry.*?>
<?import javafx.scene.control.*?>
<?import javafx.scene.layout.*?>
<?import javafx.scene.paint.*?>
<hbox alignment="CENTER_RIGHT" maxheight="-Infinity" maxwidth="1.7976931348623157E308" minheight="-Infinity" minwidth="-Infinity" prefheight="-1.0" prefwidth="-1.0" spacing="12.0" style="-fx-background-color: darkgray;" xmlns="http://javafx.com/javafx/8" xmlns:fx="http://javafx.com/fxml/1">
<children>
  <button fx:id="backButton" mnemonicparsing="false" text="Back">
  </button><button fx:id="nextButton" mnemonicparsing="false" text="Next">
  </button><button fx:id="finishButton" mnemonicparsing="false" text="Finish">
</button></children>
<padding>
  <insets bottom="12.0" left="12.0" right="12.0" top="12.0" />
</padding>
</hbox>
The definition of the toolbar is the same as in the last tutorial. The definition of the wizard steps is the same, too. Here is a FXML definition of one step:
<?import javafx.scene.text.*?>
<?import java.lang.*?>
<?import java.util.*?>
<?import javafx.geometry.*?>
<?import javafx.scene.control.*?>
<?import javafx.scene.layout.*?>
<?import javafx.scene.paint.*?>
<borderpane prefheight="240.0" prefwidth="400.0" xmlns="http://javafx.com/javafx/8" xmlns:fx="http://javafx.com/fxml/1">
      <bottom>
          <fx:include source="actionBar.fxml" />
      </bottom>
      <center>
          <stackpane maxheight="1.7976931348623157E308" maxwidth="1.7976931348623157E308" borderpane.alignment="CENTER">
              <children>
                  <label text="Welcome!">
                      <stackpane.margin>
                          <insets bottom="32.0" left="32.0" right="32.0" top="32.0" />
                      </stackpane.margin>
                      <font>
                          <font size="24.0">
                      </font>
                  </font></label>
              </children>
          </stackpane>
      </center>
</borderpane>
As a next step we need view controller classes for all views in the wizard. As a first step we will create empty classes that are annoted with the FXMLController annotation:
public class Wizard1Controller {
}
All the actions of the wizard will be triggered by the toolbar. Because the toolbar is defined on each view we can create an abstract class for the toolbar components that can be used as a superclass for the view controller classes:
    @FXML
    @ActionTrigger("back")
    private Button backButton;
    @FXML
    @ActionTrigger("finish")
    private Button finishButton;
    @FXML
    @ActionTrigger("next")
    private Button nextButton;
    public Button getBackButton() {
        return backButton;
    }
    public Button getFinishButton() {
        return finishButton;
    }
    public Button getNextButton() {
        return nextButton;
    }
}
All view controller classes can now extend the class:
public class Wizard1Controller extends AbstractWizardController {
}
Mainly the same structure was created in tutorial 3 but here we have one big different. In Chapter 3 the next button can't be defined in the super class because it was annotated with the @LinkAction annotation. This must be done in each controller class because the target of the navigation must be defined as an parameter of the annotation definition (see tutorial 3 for a more detailed description). As already mentioned we want to extract the action handling in this tutorial. So all buttons can be defined and injected in the AbstractWizardController class. As you can see in the code the buttons are annoted by the @ActionTrigger annotation that was already used in some other tutorials. By using this annotation an action id is defined and the flow will trigger the action that is specified by this id each time the button will be pressed.
The last thing that is missing is the main class. This class will look different to the main classes of the first three tutorials. Here we want to define all the actions of the wizard and link its views. To do so we start with a simple class and show the flow. You should know this kind of class from the other tutorials:
    public static void main(String[] args) {
        launch(args);
    }
    @Override
    public void start(Stage primaryStage) throws Exception {
        new Flow(WizardStartController.class).startInStage(primaryStage);
    }
}
As a next step we want to bind all the different views and create a navigation model. To do so the Flow class contains some methods that can be used to define links between views of the flow. The Flow class is defined as a fluent API and navigation links or action can be simply added to it. Here is a example for a flow with one link:
withLink(View1Controller.class, "link-id", View2Controller.class).
startInStage(primaryStage);
In the flow a link from view 1 to view 2 is defined. Both views are specified by their controller classes (View1Controller.class and View2Controller.class) and the link is defined by the unique id "link-id". Once this is done you can simply add the @ActionTrigger("link-id") annotation to a defined node in the View1Controller class. DataFX will register the navigation to view 2 for this node. So whenever the node is clicked the navigation will be transformed.
For the current example the code of the main class will look like this:
    public static void main(String[] args) {
        launch(args);
    }
    @Override
    public void start(Stage primaryStage) throws Exception {
        new Flow(WizardStartController.class).
                withLink(WizardStartController.class, "next", Wizard1Controller.class).
                withLink(Wizard1Controller.class, "next", Wizard2Controller.class).
                withLink(Wizard2Controller.class, "next", Wizard3Controller.class).
                withLink(Wizard3Controller.class, "next", WizardDoneController.class).
                withGlobalBackAction("back").
                withGlobalLink("finish", WizardDoneController.class).
                startInStage(primaryStage);
    }
}
Next to the withLink(...) method two additional methods of the Flow class are used in the code. The withGlobalLink(...) method defines a navigation action that will be registered for each view in the flow. So the @ActionTrigger("finish") annotation can be used in each view and will navigate to the last view of the wizard. For each action type that can be registered to a DataFX flow the Flow class provides methods to register the action for only one view or as a global action for all views. This is done for the back action, too. The "back" button is visible on each view of the wizard and therefore the withGlobalBackAction("back") method is used here. So whenever a action with the id "back" is triggered in any view of the flow a back action will be called. This is exactly the same as adding a @BackAction annotation to the node that should trigger the back action.
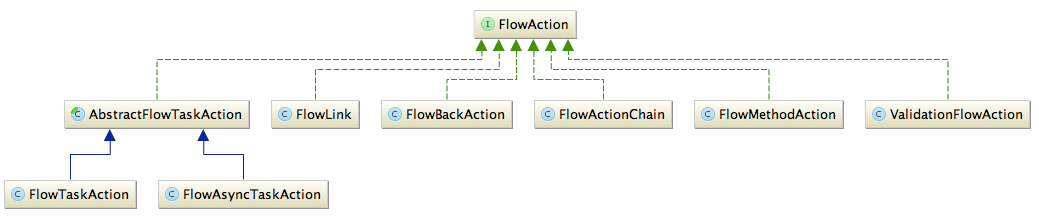
All these methods add a action to the DataFX flow. A action is defined by the interface org.datafx.controller.flow.action.FlowAction and all the shown methods will internally call the Flow.addActionToView(Class<?> controllerClass, String actionId, FlowAction action) method that will add a action instance for the defined id to a specific view. Methods that add global actions will call Flow.addGlobalAction(String actionId, FlowAction action) internally. As you can see even custom actions can be added to a flow by simply implementing the FlowAction interface. DataFX contains a set with all the most important actions types that can be added to a flow or a specific view. The following figure shows the inheritance of the FlowAction interface:
Some of the actions in the diagram will be handled in future tutorials. First I will only explain the basic action types:
FlowLinkdefines a link to another view in the flow. In the example instances of this class will be registered to the flow whenever thewithLink(...)method is called.FlowBackActionhandles a back navigation in the flow. This is the same as using the@BackActionannotation in a view controllerFlowTaskActionwill execute a task that is defined as aRunnableon the Platform Application Thread. We will see an example of the action type after this overview.FlowAsyncTaskActionwill execute a task that is defined as aRunnableon a background thread.FlowMethodActionwill call a method in the given view. The same result can be created by using the@ActionMethodannotation as shown in the first tutorial.
As you can see in this overview all the actions that were created by using annotations in the previous tutorials can be defined directly for the flow. By doing so a controller class doesn't need to now how an action is implemented. It must only now the specific id of the action and which node should trigger the action. This structure can be very helpful if default views should be used in multiple flows or if controller classes and / or action classes are part of different modules that don't depend on each other. Let's think about the following structure:
In this example the ViewController1.class, ViewController2.class and CustomAction.class don't know each other. With the help of the DataFX flow API you can simply combine them by using:
withLink(View1Controller.class, "link-id", View2Controller.class).
withAction(View2Controller.class "callAction", new CustomAction()).
startInStage(primaryStage);
As a last step I want to extent the example application and add a help output. This should be a global action that prints some help on the console. To do so the action is registered for the flow:
withLink(WizardStartController.class, "next", Wizard1Controller.class).
...
withGlobalTaskAction("help", () -> System.out.println("## There is no help for the application :( ##")).
startInStage(primaryStage);
As you can see in the code you can simply pass a lambda expression as a action to the flow because the FlowTaskAction class that is used internally here defines the action as a Runnable that is a function interface since Java8.
Once this is done the action can be triggered in any view:
public class Wizard1Controller extends AbstractWizardController {
    @FXML
    @ActionTrigger("help")
    private Hyperlink helpLink;
}
When looking at the source code of the tutorial you will see that the "help" action isn't triggered in all views. That is no problem for DataFX. A global action mustn't be called in each view and even a normal action mustn't be called in the defined controller. The API only defines that there is an action with the given id that could be called. For this last step a hyperlink tag is added to the FXML files. Here is a screenshot of the final wizard: