

DataFX 8 Tutorial 1
#DataFX
#JavaFX

As mentioned here I started a series of [DataFX]({{ site.baseurl }}{% link pages/projects/datafx.md %}) tutorials. In this post I want to show you the first simple tutorial.
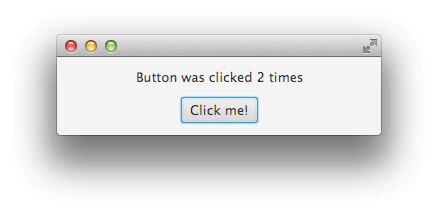
In this tutorial we want to create a simple view with only one point of interaction. The source of the tutorial can be found here. The following figure shows how the example will look like:
Every time the button in the view is clicked the text in the top label should change. To create this application we will start with the layout of the view. To do so we need a FXML file that defines the JavaFX view of the application. This can easily be created with Scene Builder. The FXML file (simpleView.fxml) of the tutorial will look like this:
<?import java.lang.*?>
<?import java.util.*?>
<?import javafx.geometry.*?>
<?import javafx.scene.control.*?>
<?import javafx.scene.layout.*?>
<?import javafx.scene.paint.*?>
<stackpane id="StackPane" maxheight="-Infinity" maxwidth="-1.0" minheight="-Infinity" minwidth="-Infinity" prefheight="-1.0" prefwidth="-1.0" xmlns:fx="http://javafx.com/fxml/1" xmlns="http://javafx.com/javafx/2.2">
  <children>
    <vbox alignment="CENTER" prefheight="-1.0" prefwidth="300.0" spacing="12.0">
      <children>
        <label fx:id="resultLabel" text="Label">
        <button fx:id="actionButton" mnemonicparsing="false" text="Click me!">
      </button></label></children>
    </vbox>
  </children>
<padding>
    <insets bottom="12.0" left="12.0" right="12.0" top="12.0" />
  </padding>
</stackpane>
Once this is created we need a controller class for the view. A first simple version that only uses JavaFX basic API will look like this:
    @FXML
    private Label resultLabel;
    @FXML
    private Button actionButton;
}
Like it is defined in the JavaFX basic API the two fields resultLabel and actionButton are named as the components defined in the FXML file by its fx:id attribute. BY adding the @FXML annotation to these fields they will be automatically injected once the controller will be instantiated.
Until now only JavaFX basic APIs are used. Now we want to add some DataFX magic. As mentioned we need some interaction every time the button is pressed. Because of that we want to trigger an action by the button. DataFX provides two annotations to handle this approach: @ActionTrigger and @ActionMethod.
The @ActionTrigger annotation can be added to a field of the controller that defines a Node in the view. The DataFX container will automatically add an action handler to the Node. Any method that should be called once an action is triggered must be annotated with the @ActionMethod annotation. For both Annotations you must specify a value that defines the unique action id of the action that is handled by the annotation. In this case I used the id myAction and added the annotations to the class:
    @FXML
    private Label resultLabel;
    @FXML
    @ActionTrigger("myAction")
    private Button actionButton;
    @ActionMethod("myAction")
    public void onAction() {
        // DO some action...
    }
}
So whenever the actionButton will be pressed the onAction() method will be called because they are bound by the same id. The id must be unique in view controller. As you will see in following tutorials there are other types of actions than simply calling a method. For now the most important point is that a component that is annotated with @ActionTrigger can trigger a method that is annotated with @ActionMethod if both annotations define the same unique action id.
As a next step we will implement the action and define a default text for the label:
    @FXML
    private Label resultLabel;
    @FXML
    @ActionTrigger("myAction")
    private Button actionButton;
    private int clickCount = 0;
    @PostConstruct
    public void init() {
        resultLabel.setText("Button was clicked " + clickCount + " times");
    }
    @ActionMethod("myAction")
    public void onAction() {
        clickCount++;
        resultLabel.setText("Button was clicked " + clickCount + " times");
    }
}
As you can see in the code a new method called init() was added. This method should be called after the controller has been initialized and the fields that are annotated with @FXML are injected. In DataFX this can be done by adding the @PostConstruct Annotation to the method. By doing so the DataFX flow container will call this method once all injectable values of the controller instance are injected. There three different types of values / fields that can be injected:
- UI components that are annotated by
@FXML - DataFX objects. Here DataFX provides several annotations
- Custom implementations. These will be injected by using the
@Injectannotation
The method that is annotated by @PostContruct will be called when all injections are finished. In this first example we will only use @FXML to inject FXML UI components to the controller.
One thing that is still missing is the binding between the controller class and the FXML file. DataFX provides the @FXMLController annotation for this purpose. By using this annotation the controller class defines its FXML file that contains the layout of the view. After adding the annotation the final controller class will look like this:
public class SimpleController {
    @FXML
    private Label resultLabel;
    @FXML
    @ActionTrigger("myAction")
    private Button actionButton;
    private int clickCount = 0;
    @PostConstruct
    public void init() {
        resultLabel.setText("Button was clicked " + clickCount + " times");
    }
    @ActionMethod("myAction")
    public void onAction() {
        clickCount++;
        resultLabel.setText("Button was clicked " + clickCount + " times");
    }
}
Once this is done we need a main class to start the application and show the view on screen. We can't use the basic FXMLLoader class here because we used some annotations that must be handled by the DataFX container. But since the last preview of DataFX 8.0 the Flow API provides a very simple way to show the view on screen. Here is the complete main class that will start the application:
    public static void main(String[] args) {
        launch(args);
    }
    @Override
    public void start(Stage primaryStage) throws Exception {
        new Flow(SimpleController.class).startInStage(primaryStage);
    }
}
The shown way is the most simple way to start a flow: the controller class of the start view is always passed as parameter to the constructor of the Flow class. Because in this demo we have only one view we simply pass the SimpleController class to the flow. The Flow class provides a utility method called startInStage() that renders the Flow in a Stage. By doing so the Scene will be created automatically and the Stage will contain a Scene that only contains the defined flow. In this first tutorial the flow will only contain one view.
This first example is quite easy and normally you could define the action binding by only one line of Java code in the init() method:
So why are all these annotations used here? As you will see in further tutorials that are more complex than this one it will make sense to use the annotations to provide more readable code.
I hope you liked this first tutorial. I plan to add the second one at the end of the week.