

DataFX Tutorial 3
#DataFX
#JavaFX

In this tutorial I want to show how a wizard dialog can be created with [DataFX]({{ site.baseurl }}{% link pages/projects/datafx.md %}). This example depends on 2 other tutorials that can be found here and here.
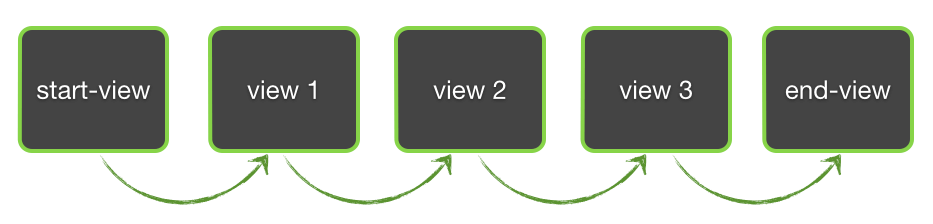
The wizard that will be created in this tutorial contains 5 different views that are linked to each other:
Next to the "next" action that navigates to the following view the wizard should support a "back" action that navigates to the last displayed view and a "finish" action that directly navigates to the last view:
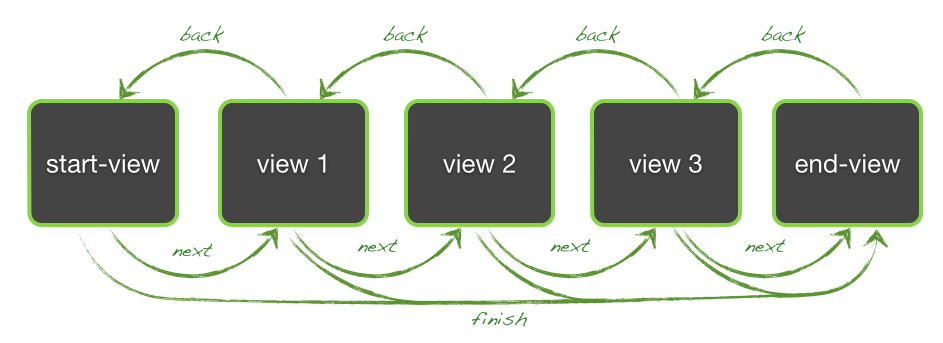
Note: The last diagram doesn't contain all possible links. Because the "back" action navigates always the last visible view you could navigate directly from the last view to the first view if the "finish" action was triggered in the first view and then the back action is triggered.
As shown in the other tutorials we will start the the view layout and generate all views by using FXML and Scene Builder. All the views of the wizard will contain a toolbar with some buttons to trigger the defined action. Here are some previews how the views will look like:

Thanks to FXML we don't need to implement the toolbar for every view. For this purpose FXML provides the fx:include tag that can be used to interleave vxml defined views. So we can define the toolbar as a separate FXML file:
<?import java.lang.*?>
<?import java.util.*?>
<?import javafx.geometry.*?>
<?import javafx.scene.control.*?>
<?import javafx.scene.layout.*?>
<?import javafx.scene.paint.*?>
<hbox alignment="CENTER_RIGHT" maxheight="-Infinity" maxwidth="1.7976931348623157E308" minheight="-Infinity" minwidth="-Infinity" prefheight="-1.0" prefwidth="-1.0" spacing="12.0" style="-fx-background-color: darkgray;" xmlns="http://javafx.com/javafx/8" xmlns:fx="http://javafx.com/fxml/1">
    <children>
        <button fx:id="backButton" mnemonicparsing="false" text="Back"></button>
        <button fx:id="nextButton" mnemonicparsing="false" text="Next"></button>
        <button fx:id="finishButton" mnemonicparsing="false" text="Finish"></button>
    </children>
    <padding>
        <insets bottom="12.0" left="12.0" right="12.0" top="12.0" />
    </padding>
</hbox>
As you can see the buttons for the 3 defined actions ("back", "next" and "finish") are defined in the toolbar. As described in the earlier tutorials these components can be injected in the controller class instances by using the @FXML annotation and a field name that matches the value of the fx:id attribute.
The FXML of the toolbar (actionBar.fxml) can now included in all the FXML files that defines the different views of the wizard. Here is the code of the first view as an example:
<?import javafx.geometry.Insets?>
<?import javafx.scene.control.Label?>
<?import javafx.scene.layout.BorderPane?>
<?import javafx.scene.layout.StackPane?>
<?import javafx.scene.text.Font?>
<borderpane prefheight="240.0" prefwidth="400.0" xmlns="http://javafx.com/javafx/8" xmlns:fx="http://javafx.com/fxml/1">
    <bottom>
        <fx:include source="actionBar.fxml" />
    </bottom>
    <center>
        <stackpane maxheight="1.7976931348623157E308" maxwidth="1.7976931348623157E308" borderpane.alignment="CENTER">
            <children>
                <label text="This is the first step.">
                    <stackpane.margin>
                        <insets bottom="32.0" left="32.0" right="32.0" top="32.0" />
                    </stackpane.margin>
                    <font>
                        <font size="24.0">
                    </font>
                </label>
            </children>
        </stackpane>
    </center>
</borderpane>
As you can see the toolbar is integrated in the bottom of the central BorderPane.
Once all FXML files are created we can start to create the view controller as described in the earlier tutorials. Therefore we create a Java class for each view and bind the class to the corresponding FXML file by using the @FXMLController annotation:
public class Wizard1Controller {
}
When looking at the @FXMLController annotation of the class you can find a new feature. Next to the fxml file that defines the view of the wizard step a title attribute is added. This defines the title of the view. Because the wizard will be added to a Stage by using the Flow.startInStage() method (see tutorial 1) the title of the flow is automatically bound to the window title of the Stage. So whenever the view in the flow changes the title of the application window will change to the defined title of the view. As you will learn in future tutorial you can easily change the title of a view in code. In addition to the title other metadata like a icon can be defined for a view or flow.
As a next step the buttons of the toolbar should be injected in the controller classes and the specific actions for them should be defined. Here a new annotation will be introduced: By using the @BackAction annotation the flow will automatically handle an action that navigates to the last visible view. The annotation can be used like the @ActionTrigger and @LinkAction annotations that were introduced in tutorial 1 and 2. Therefore the controller class for the a view in the wizard could be defined like this:
public class Wizard1Controller {
    @FXML
    @LinkAction(Wizard2Controller.class)
    private Button nextButton;
    @FXML
    @BackAction
    private Button backButton;
    @FXML
    @LinkAction(WizardDoneController.class)
    private Button finishButton;
}
When all controllers would be designed like this we would create some duplicate code. The definition of the back button and the finish button would look the same in each controller class. Therefore we will create an abstract class that contains these definitions and all other view controllers will depend on it:
    @FXML
    @BackAction
    private Button backButton;
    @FXML
    @LinkAction(WizardDoneController.class)
    private Button finishButton;
    public Button getBackButton() {
        return backButton;
    }
    public Button getFinishButton() {
        return finishButton;
    }
}
Now a controller for the wizard will look like this:
public class Wizard1Controller extends AbstractWizardController {
    @FXML
    @LinkAction(Wizard2Controller.class)
    private Button nextButton;
}
Note: The injection of private nodes in super classes is a feature of DataFX. So if you will try this by using the default FXMLLoader of JavaFX this won't work. In addition the FXMLLoader doesn't support the injection of FXML nodes that are defined in a sub-fxml that is included by using the fx:include tag. As a limitation this nodes must not have a CSS id defined because this will override the fx:id in the java object and in that case DataFX can't inject them. I plan to open a issue at OpenJFX for this.
As a last step we need to disable the "back" button on the first view and the "next" and "finish" buttons on the last view. This can be done in the view controller by defining a method with the @PostConstruct annotation that will be called once the controller instance is created:
public class WizardDoneController extends AbstractWizardController {
    @FXML
    private Button nextButton;
    @PostConstruct
    public void init() {
        nextButton.setDisable(true);
        getFinishButton().setDisable(true);
    }
}
Once this is done the wizard is completed an can be displayed in a JavaFX application. Therefore we define the following main class:
    public static void main(String[] args) {
        launch(args);
    }
    @Override
    public void start(Stage primaryStage) throws Exception {
        new Flow(WizardStartController.class).startInStage(primaryStage);
    }
}
The complete source of this tutorial can be found here.
Here is an movie of the finished wizard application: