

Dolphin Platform: How to create an application
#Dolphin Platform
#JavaFX

In this post I will show a first end to end example of the Dolphin Platform. In my last posts I already gave an overview about the concepts and APIs of the Dolphin Platform. If you have missed this post you can find them here.
The calculator application
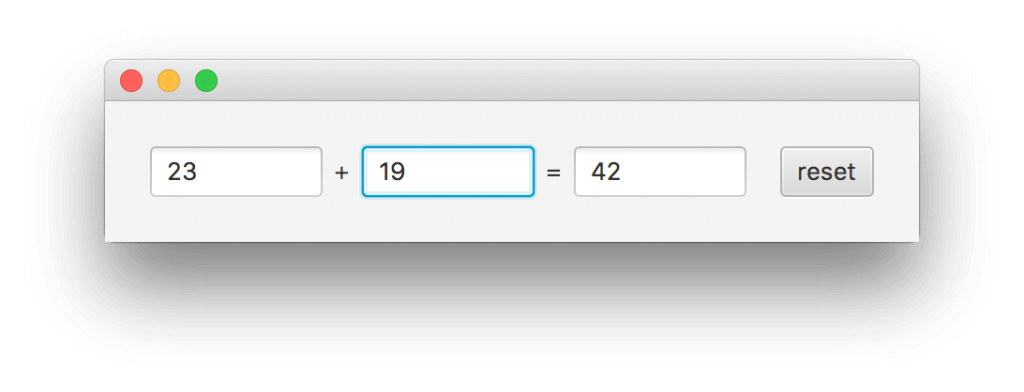
The application that I will create in this post might not be the coolest one but I think that it gives a good overview of the Dolphin Platform concepts and APIs. The final application should calculate the sum of to values and look like it is shown in the following picture:
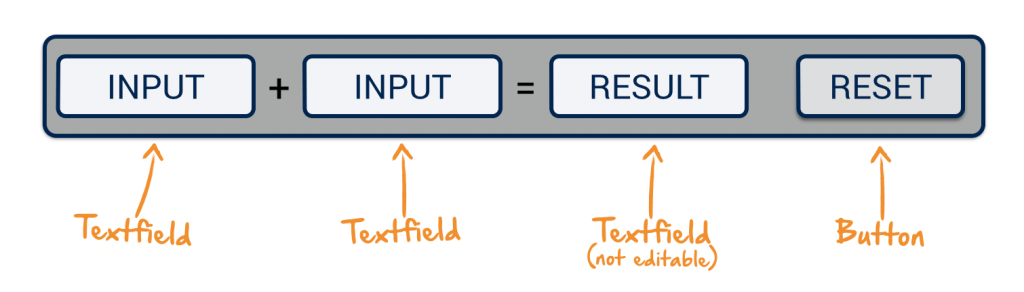
A user can type in 2 values in the textfields on the left and the result textfield will automatically be updated. In addition I will add a "reset" button that resets the content of the textfields. In general the complete functionality can be described like it is sketched in this picture:
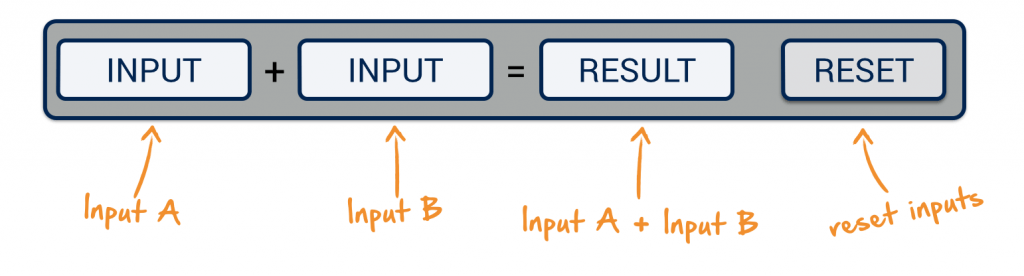
As the complete controller logic will be defined on the server when using Dolphin Platform the addition of the values and the reset action will be defined in server side controller. This might be very useful for this small example but think about bigger applications with complex calculation or a persistence layer. In addition you don't need to code the logic several times if you want to support desktop, mobile and web clients.
Before we start to create the application by using the Dolphin Platform I will create a client only application by using JavaFX. That's why I decided to use an example that normally don't need a server. We can create a client side only application by using only JavaFX. By doing so we can compare the 2 solutions later and the Dolphin Platform integration for JavaFX might become more clear. So this post might not show all benefits of the Dolphin Platform but will give a good overview of its basic APIs.
The JavaFX calculator application
As a first step I will create the layout of the application by using the SceneBuilder that can be downloaded at Gluon. Here is a picture of my final layout in SceneBuilder:
Once this is is saved as a view.fxml file we can use it in JavaFX. Here is the content of the fxml file:
<?import javafx.geometry.*?>
<?import javafx.scene.control.*?>
<?import java.lang.*?>
<?import javafx.scene.layout.*?>


<StackPane xmlns="http://javafx.com/javafx/8" xmlns:fx="http://javafx.com/fxml/1">
   <children>
      <HBox alignment="BASELINE_CENTER" maxHeight="-Infinity" maxWidth="-Infinity" minHeight="-Infinity" minWidth="-Infinity" spacing="6.0">
         <children>
            <TextField fx:id="valueAField" prefColumnCount="6" promptText="insert value A" />
            <Label text="+" />
            <TextField fx:id="valueBField" prefColumnCount="6" promptText="insert value B" />
            <Label text="=" />
            <TextField fx:id="resultField" editable="false" prefColumnCount="6" />
            <Button fx:id="resetButton" mnemonicParsing="false" text="reset">
               <HBox.margin>
                  <Insets left="12.0" />
               </HBox.margin>
            </Button>
         </children>
      </HBox>
   </children>
   <padding>
      <Insets bottom="24.0" left="24.0" right="24.0" top="24.0" />
   </padding>
</StackPane>
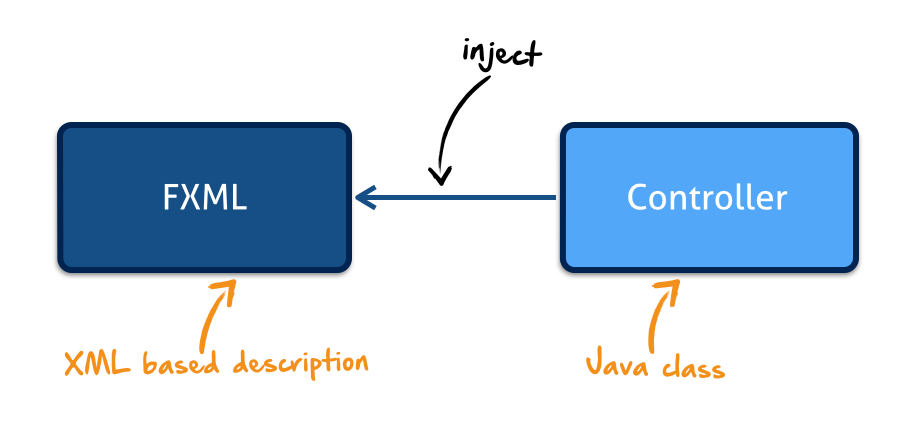
As a next step we need a controller class that add some interaction and bindings to our view. In JavaFX you can create a view by bundling a controller class and a fxml file. By doing so you can inject controls that are defined in the fxml description directly in your Java controller.
Let's start with a controller that injects all controls that we need for our use case:
    @FXML
    private TextField valueAField;

    @FXML
    private TextField valueBField;

    @FXML
    private TextField resultField;

    @FXML
    private Button resetButton;


    public void initialize() {
    }
}
In this class I already add a initialize() method that will automatically be called by JavaFX after all controls has been injected in the controller instance. Sadly this is done by some kind of magic and JavaFX don't provide an default interface for this behavior. You need to know that you can add this method to your controller class by reading the FXML documentation.
For this small example we don't need to add any other methods to the controller. Everything we want to do can be defined in the init method. Here we need to add an action to the reset button and define an binding for the values to automatically update the result value. I don't want to describe the JavaFX API in deep and just show the final source code of the method:
    resultField.textProperty().bind(Bindings.createStringBinding(() -> {
        try {
            int valueA = 0;
            int valueB = 0;
            String stringValue = valueAField.getText();
            if(stringValue != null && !stringValue.trim().isEmpty()) {
                valueA = Integer.parseInt(stringValue);
            }
            stringValue = valueBField.getText();
            if(stringValue != null && !stringValue.trim().isEmpty()) {
                valueB = Integer.parseInt(stringValue);
            }
            return (valueA + valueB) + "";
        } catch (Exception e) {
            return "Error";
        }
    }, valueAField.textProperty(), valueBField.textProperty()));

    resetButton.setOnAction(e -> {
        valueAField.setText(null);
        valueBField.setText(null);
    });
}
As a last step we need to create or view and show it on screen. Here is the main application class that does everything that we need:
    @Override
    public void start(Stage primaryStage) throws Exception {
        FXMLLoader loader = new FXMLLoader(CalculatorApplication.class.getResource("view.fxml"));
        loader.setController(new CalculatorController());

        Scene scene = new Scene(loader.load());
        primaryStage.setScene(scene);
        primaryStage.show();
    }
}
Once this is done we can start our application and it's working as expected:
The Dolphin Platform based calculator application
When creating an application based on the Dolphin Platform I start to define the model and code the basic controller functionality. Let's start with the model definition (A first description of the Dolphin Platform model API ca be found here). In the given example the model is quite small and a matching Dolphin Platform model will look like this:
public class CalculatorModel {

    private Property<String> firstValue;

    private Property<String> secondValue;

    private Property<String> result;

    public Property<String> firstValueProperty() {
        return firstValue;
    }

    public Property<String> secondValueProperty() {
        return secondValue;
    }

    public Property<String> resultProperty() {
        return result;
    }
}
If you want to simply use getter and setter methods when working with the model you can add some convenience methods:
public class CalculatorModel {

    private Property<String> firstValue;

    private Property<String> secondValue;

    private Property<String> result;

    public Property<String> firstValueProperty() {
        return firstValue;
    }

    public Property<String> secondValueProperty() {
        return secondValue;
    }

    public Property<String> resultProperty() {
        return result;
    }

    public String getFirstValue() {
        return firstValueProperty().get();
    }

    public String getSecondValue() {
        return secondValueProperty().get();
    }

    public String getResult() {
        return resultProperty().get();
    }

    public void setFirstValue(String firstValue) {
        firstValueProperty().set(firstValue);
    }

    public void setSecondValue(String secondValue) {
        secondValueProperty().set(secondValue);
    }

    public void setResult(String result) {
        resultProperty().set(result);
    }
}
The model class should be defined in a module that is shared between the client and server sources.
Once the model is done we can start working on the controller. As described in the first overview a controller will be managed by the web container on server side. Based on this all the well known Spring and JavaEE specifications can be used in Dolphin Platform controllers. In this example we will make use of the @PostContruct annotation that marks our init() method. This method will automatically be called once the controller has been created. In the init() method we can add some listeners to our model since the model instance is already created and injected in the controller instance when the @PostContruct is handled.
public class CalculatorController {

    @DolphinModel
    private CalculatorModel model;

    @PostConstruct
    public void init() {
        model.firstValueProperty().onChanged(e -> calc());
        model.secondValueProperty().onChanged(e -> calc());
    }

    private void calc() {
       //TODO: calc
    }
}
Once this is done we need to add some additional features to the controller class. Let's start with the calculation. Here we can reuse most of the code that we already used in the JavaFX only example since the Dolphin Platform Property definition is similar to the JavaFX one:
    try {
        int valueA = 0;
        int valueB = 0;
        String stringValue = model.getFirstValue();
        if(stringValue != null && !stringValue.trim().isEmpty()) {
            valueA = Integer.parseInt(stringValue);
        }
        stringValue = model.getSecondValue();
        if(stringValue != null && !stringValue.trim().isEmpty()) {
            valueB = Integer.parseInt(stringValue);
        }
        model.resultProperty().set((valueA + valueB) + "");
    } catch (Exception e) {
        model.resultProperty().set("Error");
    }
}
The last think that is missing is the "reset" functionality. Here we create a Dolphin Action that can be triggered by a client. To do so the @DolphinAction annotation can be used. Once we created the action our controller is done and will look like this:
public class CalculatorController {

    @DolphinModel
    private CalculatorModel model;

    @PostConstruct
    public void init() {
        model.firstValueProperty().onChanged(e -> calc());
        model.secondValueProperty().onChanged(e -> calc());
    }

    @DolphinAction
    public void reset() {
        model.setFirstValue(null);
        model.setSecondValue(null);
        model.setResult(null);
    }

    private void calc() {
        try {
            int valueA = 0;
            int valueB = 0;
            String stringValue = model.getFirstValue();
            if(stringValue != null && !stringValue.trim().isEmpty()) {
                valueA = Integer.parseInt(stringValue);
            }
            stringValue = model.getSecondValue();
            if(stringValue != null && !stringValue.trim().isEmpty()) {
                valueB = Integer.parseInt(stringValue);
            }
            model.resultProperty().set((valueA + valueB) + "");
        } catch (Exception e) {
            model.resultProperty().set("Error");
        }
    }
}
Now we are mostly done with the server side of our example. Since we want to use Spring Boot to run the server we need to add a main class to our application. Dolphin Platform adds Spring Boot support and therefore such a class is quite small:
public class CalculatorServer extends SpringBootServletInitializer {

    public static void main(String[] args) throws Exception {
        SpringApplication.run(new Class[]{CalculatorServer.class}, args);
    }
}
Spring Boot will automatically find the Dolphin controller and create a new instance whenever a client creates a matching view.
For the JavaFX client we will create an application class that extends the javafx.application.Application as any other JavaFX application. Here we directly create the connection to our Dolphin Platform based server application that is defined by the ClientContext class:
    private ClientContext clientContext;

    @Override
    public void init() throws Exception {
        ClientConfiguration config = new JavaFXConfiguration("http://localhost:8080/dolphin");
        clientContext = ClientContextFactory.connect(config).get();
    }

    @Override
    public void start(Stage primaryStage) throws Exception {
        //TODO
    }

    public static void main(String... args) {
        launch(args);
    }
}
For the view we will use the same MVC and FXML based approach as in the first JavaFx example. Here we can reuse the FXML file ("view.fxml") since the UI won't change. But by using Dolphin Platform the controller will be much smaller. Since the real controller class is already defined on the server we only need to define some bindings here. To do so we can extend the Dolphin Platform class AbstractViewBinder that defines all information that we need to create an interactive UI. Here we will inject all UI elements by using the @FXML annotation like before. The AbstractViewBinder class defines the abstract init() method that we need to implement in our class:
    @FXML
    private TextField valueAField;

    @FXML
    private TextField valueBField;

    @FXML
    private TextField resultField;

    @FXML
    private Button resetButton;

    public CalculatorViewBinder(ClientContext clientContext) {
        super(clientContext, Constants.CONTROLLER_NAME);
    }

    @Override
    protected void init() {
        //TODO
    }
}
I will define the content of the init() method later and finish the application class first. Here we can now load the FXML with the given controller and show it on screen:
    private ClientContext clientContext;

    @Override
    public void init() throws Exception {
        ClientConfiguration config = new JavaFXConfiguration("http://localhost:8080/dolphin");
        clientContext = ClientContextFactory.connect(config).get();
    }

    @Override
    public void start(Stage primaryStage) throws Exception {

        FXMLLoader loader = new FXMLLoader(CalculatorClient.class.getResource("view.fxml"));
        loader.setController(new CalculatorViewBinder(clientContext));

        Scene scene = new Scene(loader.load());
        primaryStage.setScene(scene);
        primaryStage.show();
    }

    public static void main(String... args) {
        launch(args);
    }
}
As you can see we only use well known JavaFX APIs here. Once this is done you can already start the server and client applications. But you won't see any data on the client since the binding is still missing. To create a binding in JavaFX the Dolphin Platform offers a helper class called FXBinder. By using the class you can define (bidirectional) bindings between Dolphin Platform properties and JavaFX properties:
FXBinder.bind(valueBField.textProperty()).bidirectionalTo(getModel().secondValueProperty());
FXBinder.bind(resultField.textProperty()).bidirectionalTo(getModel().resultProperty());
As a last step we need to define the rest function. To do so we can add an action handler to the button. In the handler we will trigger the Dolphin Action on server side. Here is the code of the final view binder class:
    @FXML
    private TextField valueAField;

    @FXML
    private TextField valueBField;

    @FXML
    private TextField resultField;

    @FXML
    private Button resetButton;

    public CalculatorViewBinder(ClientContext clientContext) {
        super(clientContext, Constants.CONTROLLER_NAME);
    }

    @Override
    protected void init() {
        FXBinder.bindBidirectional(valueAField.textProperty(), getModel().firstValueProperty());
        FXBinder.bindBidirectional(valueBField.textProperty(), getModel().secondValueProperty());
        FXBinder.bindBidirectional(resultField.textProperty(), getModel().resultProperty());
        resetButton.setOnAction(e -> invoke("reset"));
    }
}
Now we can use the client and the calculation and reset will be done on the server :). Well, this might not be necessary for the given small example but for more complex applications this handling is awesome. There are several benefits:
- If you are using a web client the user can't see any business source code since it's completely on the server side
- In bigger Dolphin Platform based application the client layer is so small that you can easily change it or add an additional client type. By doing so you can easily create an application that is running in the browser and as a desktop application
- As we will see in a future post the interaction between several clients can easily be created by using Dolphin Platform because the model and the controller for all client instances life on the server side
- There are several addition benefits like security, authorization, or persistence.
I will blog in more detail about all these benefits in future posts
I think you will see the benefit when thinking about an additional feature. Let's say the data of the application should be stored in a database whenever an calculation has been done. When doing this with JavaFX we need to connect to a database, handle transactions in the client and do a lot of more stuff. Server frameworks already contain all those features and since the Dolphin Platform example is based on Spring Boot we can simply use [Spring Data](http://Spring Data) here. In this case we only need to inject a Spring Data repository in our controller class and simply store the calculation in the DB. All challenges like transaction support will be handled by Spring in this case. When doing so your controller might look like this:
public class CalculatorController {

    @DolphinModel
    private CalculatorModel model;

    @Inject
    private SpringDataCalcRepository repository;

    @PostConstruct
    public void init() {
        model.firstValueProperty().onChanged(e -> calc());
        model.secondValueProperty().onChanged(e -> calc());
    }

    @DolphinAction
    public void reset() {
        model.setFirstValue(null);
        model.setSecondValue(null);
        model.setResult(null);
    }

    private void calc() {
        try {
            int valueA = 0;
            int valueB = 0;
            String stringValue = model.getFirstValue();
            if(stringValue != null && !stringValue.trim().isEmpty()) {
                valueA = Integer.parseInt(stringValue);
            }
            stringValue = model.getSecondValue();
            if(stringValue != null && !stringValue.trim().isEmpty()) {
                valueB = Integer.parseInt(stringValue);
            }
            model.resultProperty().set((valueA + valueB) + "");
            repository.save(new CalcEntity(valueA, valueB));
        } catch (Exception e) {
            model.resultProperty().set("Error");
        }
    }
}
This was the first complete "getting started" example of the Dolphin Platform and I hope that you like the basic concepts. We plan to upload the Dolphin Platform sources to GitHub in the next days and deploy a first preview release to Maven Central before JavaOne.
In addition I plan to add a post about Polymer based clients and how you can create web clients by using the Dolphin Platform. Stay tuned ;)