

DataFX Controller Framework Preview
#DataFX
#General
#JavaFX

Today we released the version 2.0 of [DataFX]({{ site.baseurl }}{% link pages/projects/datafx.md %}). Thanks for all the feedback that we received with the last release candidates. As a next step we will work on DataFX 8.0 that will use Java 8 and JavaFX 8. One of the new features that will be part of the next release are currently in development. Today I will show a first preview to DataFX 8.0.
The last month I added a new framework to DataFX. This framework should help to create the views of applications, define actions on them and create flows that contain a subset of views.
To show the features of the framework I will create a simple JavaFX application. The app should manage persons. Persons can be loaded, created, edited and deleted by the app. Let's have a first look on the general concept of the application:

As you can see the app contains 3 different views:
- a master view that shows all persons in a list
- a create view that can add a new person
- a edit view to edit a person
All this views are linked by actions ("save", "add", etc.) that will manipulate the data or show another view. First of all we want to take a look on the data model. Here a simple Person class is defined:
    private StringProperty name;
    private StringProperty notes;
    public Person() {
    }
    public Person (String name, String notes) {
        setName(name);
        setNotes(notes);
    }
    public String getName() {
        return nameProperty().get();
    }
    public StringProperty nameProperty() {
        if(name == null) {
            name = new SimpleStringProperty();
        }
        return name;
    }
    public final void setName(String name) {
        this.nameProperty().set(name);
    }
    public String getNotes() {
        return notesProperty().get();
    }
    public StringProperty notesProperty() {
        if(notes == null) {
            notes = new SimpleStringProperty();
        }
        return notes;
    }
    public final void setNotes(String notes) {
        this.notesProperty().set(notes);
    }
    @Override
    public String toString() {
        return getName();
    }
}
This class defines a person. Because we want to handle a list of persons we need another class that in our case defines the global data model:
    private ListProperty<Person> persons;
    private IntegerProperty selectedPersonIndex;
    public ListProperty<Person> getPersons() {
        if (persons == null) {
            ObservableList innerList = FXCollections.observableArrayList();
            persons = new SimpleListProperty<>(innerList);
        }
        return persons;
    }
    public int getSelectedPersonIndex() {
        return selectedPersonIndexProperty().get();
    }
    public void setSelectedPersonIndex(int selectedPersonIndex) {
        this.selectedPersonIndex.set(selectedPersonIndex);
    }
    public IntegerProperty selectedPersonIndexProperty() {
        if (selectedPersonIndex == null) {
            selectedPersonIndex = new SimpleIntegerProperty();
        }
        return selectedPersonIndex;
    }
}
This class defines a list of persons and the currently selected person by an index. To create a first default set of persons that can be loaded we define a additional class. In a real world application this class could wrap a database connection, for example:
    Person[] persons = {
        new Person("Johan Vos", "Johan is CTO at LodgON, a Java Champion, a member of the BeJUG steering group, the Devoxx steering group and he is a JCP member."),
        new Person("Jonathan Giles", "Jonathan Giles is the JavaFX UI controls technical lead at Oracle, where he has been involved with JavaFX since 2009."),
        new Person("Hendrik Ebbers", "Hendrik Ebbers is Senior Java Architect at Materna GmbH in Dortmund, Germany.")};
    @Inject
    private DataModel model;
    @Override
    public void run() {
        model.getPersons().clear();
        ListDataProvider ldp = ListDataProviderBuilder
                .create()
                .dataReader(new ArrayDataReader(persons))
                .resultList(model.getPersons())
                .build();
        ldp.retrieve();
    }
}
After the data model is defined we can create the first view. Let's start with the master view. To create the view Scene Builder can be used. Here we can easily design the following view:
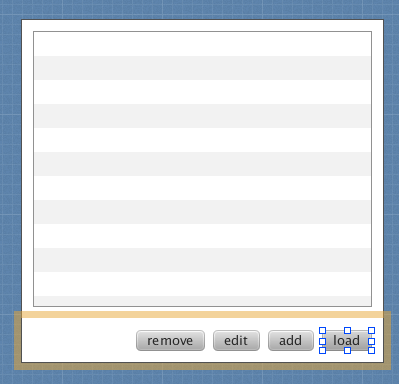
For all needed controls IDs are defined in the FXML. Normally you need to define a controller class in FXML. This is not needed for the DataFX Controller API. Instead of this we can bind a controller and a FXML view by the use of an annotation. As the next step a controller is needed. As a first step we create a small controller with some additional annotations:
public class MasterViewController {
@FXML
private Button editButton;
@FXML
private Button removeButton;
@FXML
private Button addButton;
@FXML
private Button loadButton;
@FXML
private ListView dataList;
}
In this first version there is only one difference to the default JavaFX APIs: The FXMLController annotation is added. This annotation defines the link between the controller class and the FXML file. As a next step we want to create a data model. Here the next benefit of the framework can be used: Context Dependency Injection. To add a model to the the controller we can simple inject it:
private DataModel model;
To explain what happens here the CDI module in DataFX need to be described a little bit more. As in JEE CDI different scopes are supported in DataFX:
- ViewScope
- FlowScope
- ApplicationScope
All this scopes have a different context is is managed by the framework. All items that are part of the ViewScope have a lifetime of one view. A view is for example the master view in our example. The Application scope is defined as a global scope. All items in this scopes are singletons. The Singleton scope that is already defined in javax.inject can be used here, too. The flow scope defines a flow of views. In our example we will create one flow that handles all the defines views. In a more complex applications different flows can be handled. You can easily create a flow for each tap in a business application, for example. Additionally DataFX supports the dependent scope as it is defined in JEE.
The data model in our application need to be defined in the flow scope. It should be accessed from all views in this scope. To do so a scope annotation need to be added to the class:
public class DataModel {
...
}
Once this is done we can easily inject the data model in our view:
public class MasterViewController {
    ...
    @Inject
    private DataModel model;
}
As a next step some initial setup is needed. To do so the PostConstruct annotation is supported by the DataFX framework:
public class MasterViewController {
    ....
    @PostConstruct
    public void init() {
        dataList.itemsProperty().bind(model.getPersons());
        model.selectedPersonIndexProperty().bind(dataList.getSelectionModel().selectedIndexProperty());
    }
}
Now the ListView is bounded to the data model. To create some basic data a action is needed. This action should fire when the "load" button is pressed. First we create a simple class that handles the action:
    Person[] persons = {
        new Person("Johan Vos", "Johan is CTO at LodgON, a Java Champion, a member of the BeJUG steering group, the Devoxx steering group and he is a JCP member."),
        new Person("Jonathan Giles", "Jonathan Giles is the JavaFX UI controls technical lead at Oracle, where he has been involved with JavaFX since 2009."),
        new Person("Hendrik Ebbers", "Hendrik Ebbers is Senior Java Architect at Materna GmbH in Dortmund, Germany.")};
    @Inject
    private DataModel model;
    @Override
    public void run() {
        model.getPersons().clear();
        ListDataProvider ldp = ListDataProviderBuilder
                .create()
                .dataReader(new ArrayDataReader(persons))
                .resultList(model.getPersons())
                .build();
        ldp.retrieve();
    }
}
As you can see the injected model is used here, too. This task can be added to the button by the use of the Flow API. This API defines a flow through all views. The first very simply version of our flow looks like this:
withTaskAction(MasterViewController.class, "load", LoadPersonsTask.class);
This defines a flow that starts with the master view and adds a task action to this view. The action is defined by the id "load". To bind this action to the load button only a additional annotation is needed in the controller:
@FXMLFlowAction("load")
private Button loadButton;
Now the first version of the application can be started. To do so we need a main class that adds the flow to a JavaFX scene:
    public static void main(String[] args) {
        launch(args);
    }
    @Override
    public void start(Stage stage) throws Exception {
        Flow flow = new Flow(MasterViewController.class).
                withTaskAction(MasterViewController.class, "load", LoadPersonsTask.class);
        DefaultFlowContainer container = new DefaultFlowContainer();
        flow.createHandler().start(container);
        Scene scene = new Scene(container.getPane());
        stage.setScene(scene);
        stage.show();
    }
}
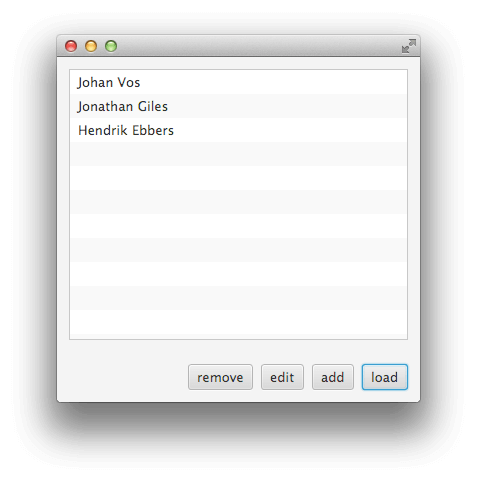
The DefaultFlowContainer class is used in the code. This class is a default implementation of a Pane that wraps a flow. When you start the application the "load" button can be used to load the list of persons. Because of the JavaFX binding the result will be shown directly:
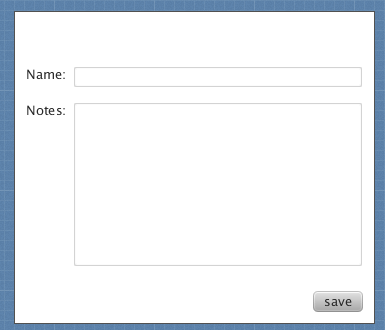
As a next step we want to add the edit action to the application. Here an additional view need to be created by Scene Builder:
Additionally a controller class is needed. This class uses the described features:
public class EditViewController {
    @FXML
    @FXMLFlowAction("save")
    private Button saveButton;
    @FXML
    private TextField nameField;
    @FXML
    private TextArea notesTextArea;
    @Inject
    private DataModel model;
    @PostConstruct
    public void init() {
        Person p = model.getPersons().get(model.getSelectedPersonIndex());
        nameField.textProperty().bindBidirectional(p.nameProperty());
        notesTextArea.textProperty().bindBidirectional(p.notesProperty());
    }
}
The data model is injected to the controller. Because it is defined in the flow scope it will be the same instance as in the master view. Additionally some bindings will be created to bind the UI controls to the data model. A flow action is added to the save button. This action is defined by the "save" ID. To add this view to the flow only some additional code is needed:
               withLink(MasterViewController.class, "edit", EditViewController.class).
               withLink(EditViewController.class, "save", MasterViewController.class).
               withTaskAction(MasterViewController.class, "load", LoadPersonsTask.class);
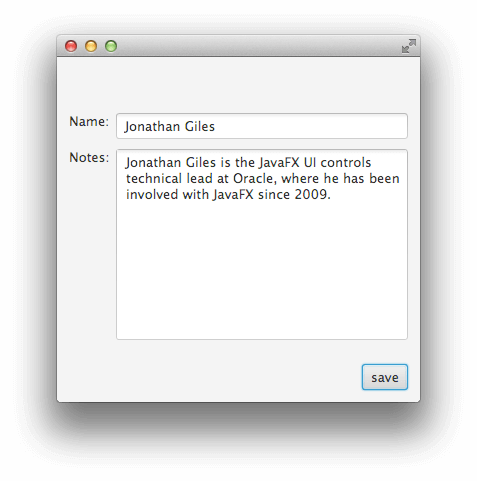
As you can see two links are added to the flow. This links are actions that will change the current view of the flow. In this cases we want to link from the master page to the edit page and vice versa. When you start the application now you can edit all persons that are part of the list:
As a next step we want to add the remove action to the master view. This can be easily done by adding another action:
    @Inject
    private DataModel model;
    @Override
    public void run() {
        model.getPersons().remove(model.getSelectedPersonIndex());
    }
}
As the import action this action need to be defined in the flow and bound to a button:
@FXMLFlowAction("remove")
private Button removeButton;
Additionally the flow need to be changed:
               withLink(MasterViewController.class, "edit", EditViewController.class).
               withLink(EditViewController.class, "save", MasterViewController.class).
               withTaskAction(MasterViewController.class, "remove", RemoveActionTask.class).
               withTaskAction(MasterViewController.class, "load", LoadPersonsTask.class);
The Flow API of DataFX supports different types of actions. The link action and the task action are used in this example until now. As a next step we want to add the view to create new persons. Here we will use some additional features of the framework.
Because the view should look like the edit view we can reuse the FXML here. Additonally a controller is needed. Here is a first basic version:
public class AddViewController {
    @FXML
    @FXMLFlowAction("save")
    private Button saveButton;
    @FXML
    private TextField nameField;
    @FXML
    private TextArea notesTextArea;
    private StringProperty nameProperty = new SimpleStringProperty();
    private StringProperty noteProperty = new SimpleStringProperty();
    @Inject
    private DataModel model;
    @PostConstruct
    public void init() {
        nameField.textProperty().bindBidirectional(nameProperty);
        notesTextArea.textProperty().bindBidirectional(noteProperty);
    }
}
The data that is added in the view will be stored in the two properties that are defined in the view. Once everything is fine a new person should be created and added to the data model. To do so we use a new action type: The MethodAction. With this type a method of the controller can easily bound to an button. To do so we add a method with the needed annotation in the controller class:
public class AddViewController {
@FXML
@FXMLFlowAction("save")
private Button saveButton;
...
@ActionMethod("addPerson")
    public void addPerson() {
        Person p = new Person();
        p.setName(nameProperty.get());
        model.getPersons().add(p);
   }
}
Like all other actions this action need to be added to the flow. Because we want to add the person to the data model and then jump back to the master view a action chain is used here:
               withLink(MasterViewController.class, "edit", EditViewController.class).
               withLink(MasterViewController.class, "add", AddViewController.class).
               withLink(EditViewController.class, "save", MasterViewController.class).
               withTaskAction(MasterViewController.class, "remove", RemoveActionTask.class).
               withTaskAction(MasterViewController.class, "load", LoadPersonsTask.class).
               withAction(AddViewController.class, "save", new FlowActionChain(new FlowMethodAction("addPerson"), new FlowLink<masterviewcontroller>(MasterViewController.class)));
A action chain defines a list of actions that will be handled. In this example the "save" button is bound to an action chain that first calls the "addPerson" method and then links to the master view. By doing so new persons can be created.
Next to all the action types that are shown in this example DataFX will provide additional ones and the ability to add custom action classes.
As a last step we want to add validation. When a new person is created we want to check if the name is not null. The DataFX API supports the default Java Bean Validation and adds to support for JavaFX properties. Because of this we can easily add a NotNull annotation to the name property:
private StringProperty nameProperty = new SimpleStringProperty();
To validate the data of the view a validation action can be added to the action chain that is bound to the "save" button:
               ...
               withAction(AddViewController.class, "save", new FlowActionChain(new ValidationFlowAction(), new FlowMethodAction("addPerson"), new FlowLink<MasterViewController>(MasterViewController.class)));
The validation action automatically validates all validatable fields that are defined in the controller. Groups, as defined in the Java Bean Valdidation, are supported, too. When any data is not valid the action chain will stop.
To provide feedback to the user some additional code is needed. The validator can be injected to the controller:
private ValidatorFX<MasterViewController> validator;
Now we can add a event handler to the validator that will show violations on screen:
public class AddViewController {
...
 @FXML
 private Label violationLabel;
 @Validator
 private ValidatorFX<MasterViewController> validator;
 @PostConstruct
    public void init() {
        ...
        validator.setOnValidationFinished(event -> handleViolations(event.getViolations());
    }
    private void handleViolations(Set<ConstraintViolation<MasterViewController>> violations) {
        if(violations.isEmpty()) {
            violationLabel.setVisible(false);
        } else {
            ConstraintViolation<MasterViewController> violation = violations.iterator().next();
            violationLabel.setText(violation.getPropertyPath() + " " + violation.getMessage());
            violationLabel.setVisible(true);
        }
    }
}
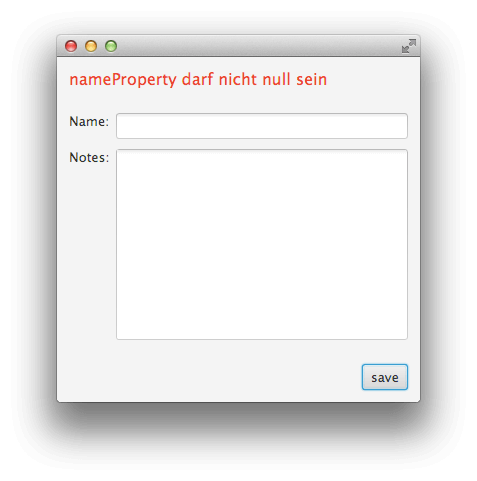
Once this is done the view will show violations on the screen:
This example shows some of the DataFX Controller features. The complete API is not finished yet and can be found in a branch of the DataFX repository. I hope to receive some feedback about this example.