

Introducing Vagrant-Binding
#General
#Vagrant-Binding

Today I want to introduce the Vagrant-Binding Java API. The API is build on top of the OpenSource Tool Vagrant. Vagrant is a ruby based tool for virtual machine automation. With Vagrant you can set up complex virtual systems in only a few minutes. Every vm that is created with Vagrant based on a config-file that describes the configuration of the virtual machine and all installed software on it. You can configure a Ubuntu 64 bit vm with a running MySql server for example. With the Java API "Vagrant-Binding" you can put the automation on the next level.
Vagrant-Binding is OpenSource and available at github. It offers some nice builder APIs so that you can programmatically set up your vm. In addition to this Vagrant-Bindings gives you the opportunity to sync the lifecycle of your virtual machines with your JUnit Unit Tests. All you need is a VirtualBox installation on your system.
Getting started
The simplest way to start building your virtual machines in Java is the Builder-API. With a few Builder-Classes you can set up a complete environment of different virtual machines at runtime. To run all the example you need a VirtualBox installation on your system. I suggest you to use version 4.1.16 because this is the version I am currently using. I Don't know if every version is working fine with Vagrant. The actual "Vagrant-Binding" snapshot bundles Vagrant version 1.0.5. So you don't need a additional Vagrant installation on your system.
Here is a short example that creates an Ubuntu 32bit vm:
.create()
.withLucid32Box()
.withName("myVM")
.build();

VagrantEnvironmentConfig environmentConfig = VagrantEnvironmentConfigBuilder
.create()
.withVagrantVmConfig(vmConfig)
.build();

Vagrant vagrant = new Vagrant(true);

VagrantEnvironment environment = vagrant
.createEnvironment(new File("my/locale/path"), environmentConfig);

environment.up();
You can configure your vm by using a static ip and some port forwarding for example:
VagrantVmConfig vmConfig = VagrantVmConfigBuilder
.create()
.withLucid32Box()
.withName("myVM").
.withHostOnlyIp("192.168.50.4")
.withVagrantPortForwarding(portForwarding).build();
The code creates a VmConfig with some special features. This VmConfig is put into a VagrantEnvironment. One Environment can capsulate as many virtual machines as you want. You can start the whole environment by calling environment.up(). This creates and starts up every virtual machine that is defined in the environment within a fe minutes. If you want you can access every machine and start or stop it manually:
  vm.destroy();
}
Each vm has a lifecycle. You can change the state of the lifecycle easily:
vm.suspend();
vm.resume();
vm.halt();
vm.destroy();
To configure the software, which will be installed on the virtual machine you need a Puppet configuration script. Puppet is a tool that automates the installation and administration of software. Each virtual machine that is created by Vagrant runs Puppet by default. So you only need a configuration script. Here is a simple example that edits the welcome message of a virtual machine:
ensure => "present",
}

File { owner => 0, group => 0, mode => 0644 }

file { '/etc/motd':
content => "Welcome to your Vagrant-built virtual machine!
Managed by Puppet.\n"
}
You can easily use your puppet scripts with Vagrant-Binding:
.create()
.withManifestPath("path/to/puppetscript")
.withManifestFile("config.pp")
.build();

VagrantVmConfig vmConfig = VagrantVmConfigBuilder
.create()
.withLucid32Box()
.withPuppetProvisionerConfig(puppetConfig)
.build();
After starting your virtual machine you can use SHH to connect on the machine. "Vagrant-Binding" provides a class for file upload and process execution over ssh. You can start your jobs on the virtual machine by simple using a code like this:
connection.execute("touch /path/to/any/file", true);
Using Vagrant-Binding for real sandbox testing
Vagrant-Binding offers a special @Rule for JUnit. By using this Rule you can capsule each of your tests with a fully vm lifecycle. Let us assume we have the following Unit Test:
public void testJdbc() {
  System.out.println("Test starts");
  try {
    Class.forName("com.mysql.jdbc.Driver");
    Connection connection = DriverManager.getConnection("jdbc:mysql://192.168.50.4/testapp?user=dbuser&password=dbuser");

    Statement statement = connection.createStatement();
    String table = "CREATE TABLE mytable (data_entry VARCHAR(254))";
    statement.executeUpdate(table);
    statement.close();

    for(int i=0; i < 100; i++) {
      statement = connection.createStatement();
      statement.executeUpdate("INSERT INTO mytable VALUES(\"" + UUID.randomUUID().toString() + "\")");
      statement.close();
    }

    statement = connection.createStatement();
    ResultSet resultSet = statement.executeQuery("SELECT COUNT(*) FROM mytable");
    resultSet.next();
    Assert.assertEquals(100, resultSet.getInt(1));
    statement.close();
    connection.close();
  } catch (Exception e) {
    e.printStackTrace();
    Assert.fail();
  }
}
The test creates the table "mytable", adds 100 rows into it and checks the rowcount. To run this test successfully you need a machine with the hard ip "192.168.50.4" and a MySQL Server. You need a database "testapp" on the server too. On this database there must not be a table called "mytable". So you can only run this Unit Test one time because it doesn't drop the table "mytable" at the end. You can expand the test and drop the table at the end but what will happen in case of an error? Every time the test starts automatically you do not know the state of the server, database and table. Another problem is that you can't run the test parallel.
With Vagrant-Binding you can create your database server as a vm on the fly. All you need to do is adding a VagrantTestRule to your test class:
The Rule needs a configuration that is easily created:
  PuppetProvisionerConfig puppetConfig = PuppetProvisionerConfigBuilder
  .create()
  .withManifestPath("/path/to/manifests")
  .withManifestFile("dbserver.pp")
  .withDebug(true)
  .build();

  VagrantVmConfig vmConfig = VagrantVmConfigBuilder
  .create()
  .withName("mysqlvm")
  .withHostOnlyIp("192.168.50.4")
  .withBoxName("lucid32")
  .withPuppetProvisionerConfig(puppetConfig)
  .build();

  VagrantEnvironmentConfig environmentConfig = VagrantEnvironmentConfigBuilder
  .create()
  .withVagrantVmConfig(vmConfig)
  .build();

  VagrantFileTemplateConfiguration fileTemplateConfiguration = VagrantFileTemplateConfigurationBuilder
  .create()
  .withLocalFile(new File("/path/to/my.cnf"))
  .withPathInVagrantFolder("files/my.cnf")
  .build();

  VagrantConfiguration configuration = VagrantConfigurationBuilder
  .create()
  .withVagrantEnvironmentConfig(environmentConfig)
  .withVagrantFileTemplateConfiguration(fileTemplateConfiguration)
  .build();

  return configuration;
}
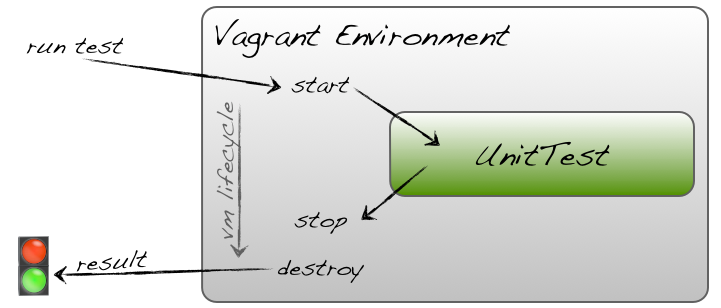
The "VagrantTestRule" syncs every single test with the livecycle of the Vagrant environment. Each vm that is defined in the environments starts before the UnitTests runs and stops after the test:
You can access the environment and execute commands on the virtual machines by SSH for example while the test is running by calling "testRule.getEnvironment()".
I'm using a Puppet script that I found on github to configure the database server vm with Puppet.
I will host a project with some demos and tutorials within the next days on github. You need to download and install the Vagrant-Binding project as maven dependency because it is not available at Maven Central Repository at the moment.
Current state of the project and some limitations
The API is in a very early state. I haven't even tried everything until today and there are only a few Unit Tests. There is currently no existing javadoc and only some simple examples. So please do not use this API in production - at the moment :)
There is a jruby bug on windows 64 bit so that Vagrant-Binding is actually not working there.
Further reading
Vagrant has a very good quickstart and documentation. All of the features I implemented until today are strongly adopted from Vagrant. There are are lot of good Puppet examples out there. I read "Pulling Strings With Puppet" that helped me a lot.